It is my privilege to welcome Christiana to The Best VBS today! She has the BEST tutorial for you for making T-Shirts for your VBS! You can use this tutorial no matter what your theme is for VBS – be it In the Wild, Roar, Incredible Race, Power Up, Mission to Mars, GiddyUp Junction or any other theme!
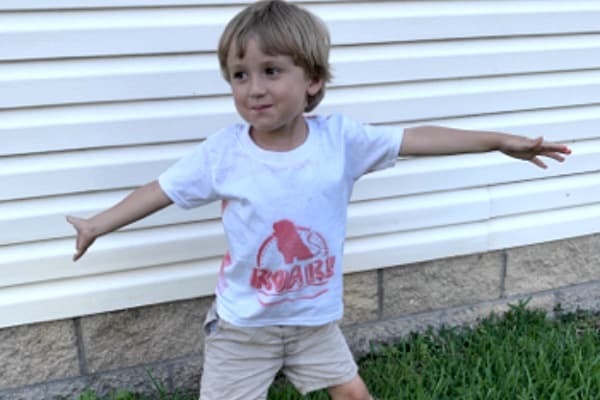
Keep reading to see how she makes this super cute, and super simple T-shirt with 12 preschoolers, but it is age appropriate for all ages at VBS!
Want a cheap, quick, long lasting, and kid friendly method for making T-shirts for VBS?
These T-shirts can be made, dried and worn during a single Vacation Bible School station (less than 20 min).
Scaled up, you can expect to spend about 35 cents in materials, plus the cost of the shirt.
This post may contain affiliate links. That means if you click and buy, I may receive a small commission. Please see my full disclosure policy for details.
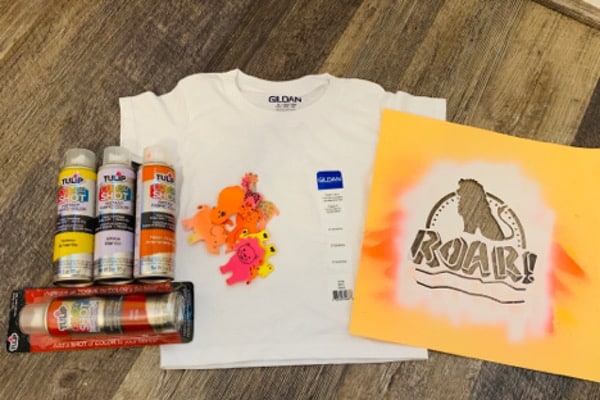
Supplies:
- Tulip ColorShot Fabric Spray ($6.99 at most crafts stores, $3.50 or less after coupons) or you can grab it online
- 12×12 Heavy Cardstock
- T-Shirt (white is simplest)
- Cricut (or other cutting machine)
- Something to protect your work surface (I used an old poster board)
- Optional: Foam animals and other shapes
1. Design/Purchase a Stencil File to match your VBS theme
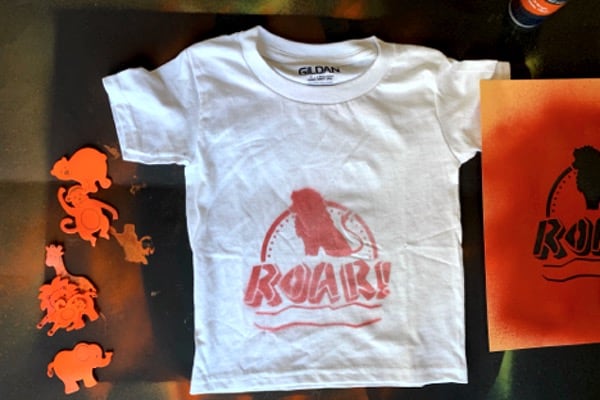
First… just buy a stencil file! I’ll take you through what I learned, but in many cases you can find a file that’s already designed (your time is valuable). The logo for Group’s Roar VBS seemed made for a stencil (the letters of ‘Roar’ happened to be in a stencil friendly font).
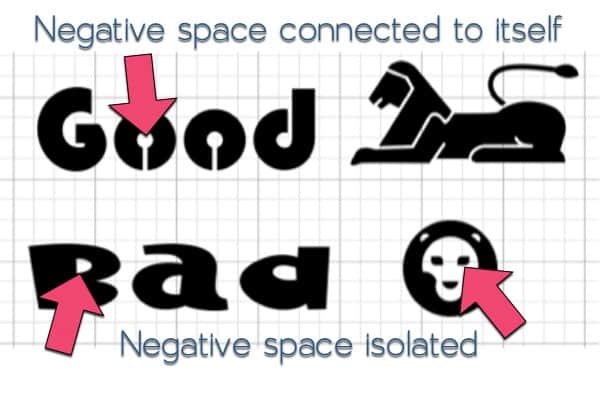
I spent some time (ok an hour and half) in Adobe Photoshop connecting bits and erasing others before importing into Cricut’s Design Space. If you want to make a stencil, remember that there cannot be any blank space not connected to itself. This is especially true when selecting fonts.
See Example. In Design Space you can search for stencil fonts (I like Blippo) and there are are many other free ones available on da-font for download.
2. Cut Stencil(s) to use for your T-shirts for VBS
Import your stencil file into Design Space (or whatever program your cutting machine uses). I used heavyweight 12×12 cardstock and the stencil has lasted for 12 uses so far.
If you’re going to be making lots of t-shirts for VBS, I suggest cutting quite a few of these (that way you can let it dry a little in between or have multiple kids making shirts at once).

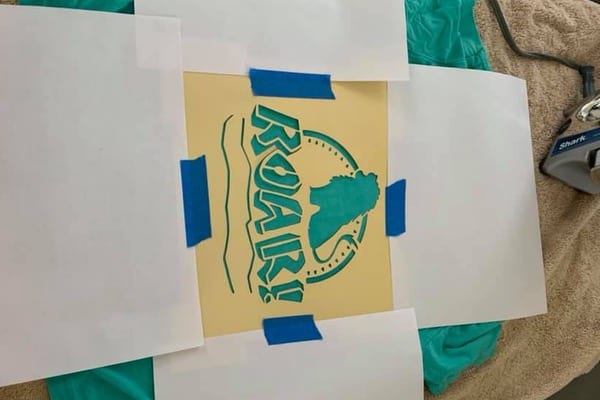
3. Position Vacation Bible School T-Shirt and Stencil
Find a protected area, even a tiny bit of wind is too much. A garage is perfect, but I’ve also done shirts in a large carpeted hall without overspray problems (and I had 12 preschoolers with me at the time).
In the pictures, I used a piece of poster board behind my shirt. Then, I put my stencil on top of the shirt. If any part of the shirt shows past the edge of the stencil, it would be helpful to mask it with scrap card-stock (no need to tape down, it should be heavy enough to stay in place).
Tip: You don’t have to put anything inside your t-shirt, the dye does not soak through.
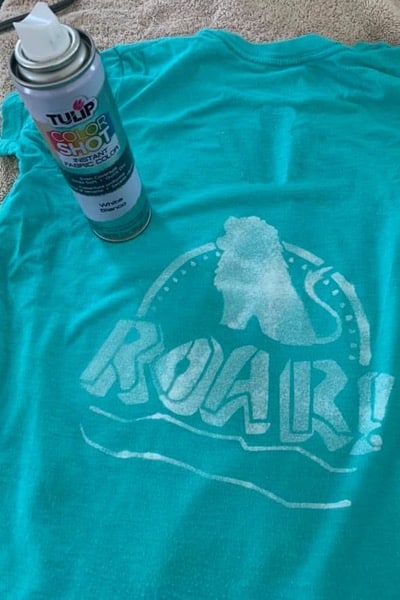
4. Spray T-Shirt with Tulip Fabric Spray
This step is key. First, really do shake the can for a full minute, it matters.
Then lightly go over the stencil, being sure not to start or stop over your shirt. I held the can 6 inches away and it took 3 passes (about 2 seconds) to cover the full stencil.
Resist the urge to go over the same spot twice; It won’t ruin the shirt, but less dye means less dry time, less expense and gives a neat distressed look.
Tip: Just about any color of Tulip ColorShot will work on a white t-shirt. If you use a colored t-shirt for VBS, I’ve found that white spray works best.
5. Remove Stencil
You can take the stencil off anytime after 15 seconds. The shirt will be mostly dry (If you went over the same spot twice, the dry time will be much longer).
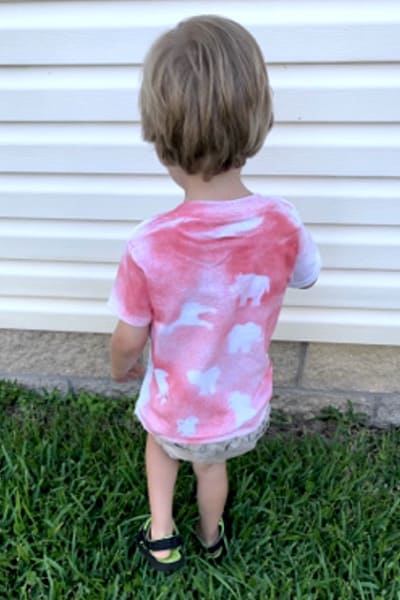
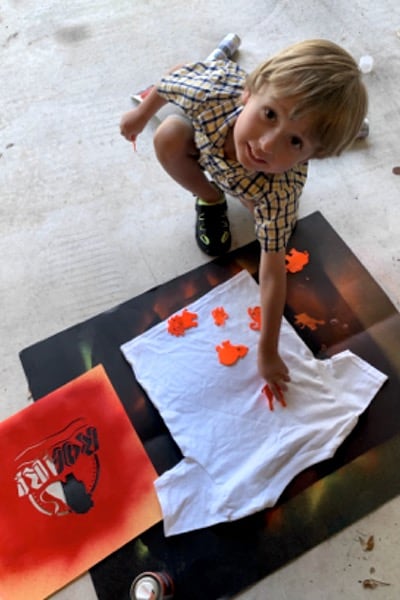
6. Optional back side of T-Shirt craft
The back side is where kids get to personalize their shirt. As soon as the shirt is dry to the touch, you can flip it over (I waited 2 minutes just to be safe).
I let my preschooler arrange foam animal stickers on the shirt. Then I sprayed the shirt all over. Try not to overlap, white spots are ok.
Tip: You do not need to take the paper backing off the stickers, the weight of the foam can keep the shapes in place if you are careful while you spray your t-shirts.
The shirts I made over a year ago stayed colorfast and vibrant and do not require and special care. This year, my church will be making 150 of these shirts and letting the kids (ages 3 and up) help arrange the stencils (I do not recommend letting youth spray as they are likely to overspray and overlap.)
You may want to check out these articles full of helpful tips for Vacation Bible School Directors:
- Eight Things I want my VBS Volunteers to Know
- Trouble getting Vacation Bible School decorations to stick on walls? Learn what veteran VBS Directors use and a wealth of other tips from them.
- Six ways to equip your people to pray for the kids coming to VBS

Christiana Garst
Christiana has been involved in VBS as a co-director for four year alongside her awesome Preschool Director. She also has the privilege of leading the Imagination Station rotation.
Christie has been involved with VBS for over 16 years! Some of those years she attended as a kid and then she has helped in some capacity for the rest.
When asked what her favorite VBS memory was, Christiana replied,
Last year our Pastor was selected to play Jesus and carry the huge, heavy cross. He was scripted to stumble a little and everyone gasped when he did. It was a very serious moment and the kids were paying careful attention. For many of them it was the first time they had considered the weight of the cross which allowed us to then explained the much greater weight of sin.
Very nice post. I just stumbled upon your blog and wished to say that I’ve truly enjoyed surfing around your blog posts. After all I will be subscribing to your feed and I hope you write again very soon!
Thanks for your submission. I also think laptop computers are getting to be more and more popular today, and now will often be the only type of computer employed in a household. It is because at the same time that they’re becoming more and more reasonably priced, their computing power keeps growing to the point where there’re as effective as pc’s out of just a few years back.
My rather long internet look up has at the end of the day been compensated with pleasant insight to talk about with my family and friends.
Some us know all relating to the compelling medium you present powerful steps on this blog and therefore strongly encourage contribution from other ones on this subject while our own child is truly discovering a great deal. Have fun with the remaining portion of the year.
Thank you sharing these types of wonderful posts. In addition, the best travel and also medical insurance system can often reduce those issues that come with visiting abroad. Some sort of medical emergency can shortly become very expensive and that’s likely to quickly slam a financial weight on the family’s finances. Having in place the great travel insurance package deal prior to setting off is definitely worth the time and effort. Thanks a lot
Hey there! Looking for some cute printable svg horror digital download images? You’re in for a treat! We’ve got a wide range just for you. Let loose your creativity as you paint these charming spooky images. Whether you love detailed halloween or fun cartoon halloween images, we’ve got something to suit every preference. So grab your best imaging tools, print out these fantastic pages, and start coloring your masterpieces. Don’t forget to share your completed works with us. Tag your spooky friends too. Happy artistry!
Hey there! Looking for some lovely downloadable halloween digital download images? You’re in luck! We’ve got a variety just for you. Let loose your imagination as you color these delightful halloween images. Whether you prefer realistic spooky or fun animated halloween images, we’ve got something to suit every taste. So grab your favorite imaging tools, print out these fantastic pages, and begin coloring your artworks. Don’t miss to showcase your completed pieces with us. Mention your halloween friends too. Happy coloring!
I抣l immediately grab your rss feed as I can’t find your e-mail subscription link or newsletter service. Do you’ve any? Kindly let me know so that I could subscribe. Thanks.
Hey there! Looking for some cute downloadable halloween digital download images? You’re in for a treat! We’ve got a vast selection just for you. Unleash your imagination as you paint these delightful spooky images. Whether you prefer realistic spooky or fun animated scary images, we’ve got something to please every taste. So grab your favorite imaging tools, download these amazing pages, and start coloring your artworks. Don’t miss to share your finished works with us. Mention your spooky buddies too. Happy coloring!
Hey there! Looking for some cute printable svg horror digital download images? You’re in luck! We’ve got a wide range just for you. Let loose your imagination as you paint these delightful spooky images. Whether you prefer realistic halloween or fun animated spooky images, we’ve got something to suit every taste. So grab your favorite imaging tools, print out these fantastic pages, and begin coloring your masterpieces. Don’t miss to showcase your finished pieces with us. Mention your halloween buddies too. Happy coloring!
Hey there! Looking for some adorable downloadable halloween digital download images? You’re in for a treat! We’ve got a variety just for you. Let loose your imagination as you paint these charming scary images. Whether you love realistic scary or playful cartoon scary images, we’ve got something to suit every taste. So grab your favorite imaging supplies, print out these fantastic pages, and begin coloring your artworks. Don’t forget to showcase your completed works with us. Tag your halloween buddies too. Happy artistry!
Hey there! Looking for some lovely printable svg horror digital download images? You’re in luck! We’ve got a variety just for you. Unleash your imagination as you paint these charming spooky images. Whether you prefer realistic halloween or playful cartoon scary images, we’ve got something to please every preference. So get your best imaging supplies, print out these fantastic pages, and begin coloring your masterpieces. Don’t forget to showcase your finished pieces with us. Tag your scary buddies too. Happy coloring!
Hi there, I discovered your blog by the use of Google while looking for a similar topic, your web site came up, it looks good. I’ve bookmarked it in my google bookmarks.
Hey there! Looking for some adorable printable halloween digital download images? You’re in luck! We’ve got a vast selection just for you. Let loose your creativity as you color these delightful halloween images. Whether you prefer detailed scary or playful cartoon scary images, we’ve got something to suit every taste. So grab your best imaging tools, print out these fantastic pages, and begin coloring your masterpieces. Don’t forget to showcase your finished pieces with us. Tag your halloween buddies too. Happy coloring!
Hey there! Looking for some lovely downloadable halloween digital download images? You’re in for a treat! We’ve got a vast selection just for you. Let loose your creativity as you paint these charming spooky images. Whether you love detailed halloween or fun cartoon halloween images, we’ve got something to suit every preference. So grab your favorite imaging supplies, download these amazing pages, and start coloring your artworks. Don’t miss to share your finished works with us. Mention your spooky friends too. Happy artistry!
Hey there! Looking for some adorable printable halloween digital download images? You’re in for a treat! We’ve got a wide range just for you. Unleash your imagination as you color these delightful halloween images. Whether you prefer realistic halloween or fun animated halloween images, we’ve got something to please every preference. So get your best imaging supplies, print out these fantastic pages, and start coloring your artworks. Don’t miss to showcase your completed works with us. Tag your halloween buddies too. Happy artistry!
Hey there! Looking for some cute downloadable halloween digital download images? You’re in for a treat! We’ve got a wide range just for you. Unleash your imagination as you color these charming halloween images. Whether you love realistic scary or playful cartoon halloween images, we’ve got something to suit every preference. So get your best imaging tools, download these fantastic pages, and begin coloring your masterpieces. Don’t forget to share your completed works with us. Mention your scary buddies too. Happy coloring!
Hey there! Looking for some adorable printable svg horror digital download images? You’re in luck! We’ve got a wide range just for you. Unleash your imagination as you color these charming spooky images. Whether you prefer detailed scary or fun cartoon halloween images, we’ve got something to please every taste. So grab your favorite imaging supplies, download these amazing pages, and start creating your masterpieces. Don’t miss to showcase your completed pieces with us. Mention your scary buddies too. Happy coloring!
You actually make it seem so easy with your presentation but I find this matter to be actually something that I think I would never understand. It seems too complicated and very broad for me. I’m looking forward for your next post, I will try to get the hang of it!
You could certainly see your expertise in the work you write. The world hopes for even more passionate writers like you who are not afraid to say how they believe. Always go after your heart.
You think like I do! Love it!
Good web site! I truly love how it is easy on my eyes and the data are well written. I am wondering how I could be notified whenever a new post has been made. I’ve subscribed to your RSS which must do the trick! Have a nice day!
Sustain the excellent work and producing in the group!
Please tell me more about your excellent articles
I’m so in love with this. You did a great job!!
Thank you for your help and this post. It’s been great.
m3twsz
Thank you for providing me with these article examples. May I ask you a question?
You’ve been great to me. Thank you!
May I request that you elaborate on that? Your posts have been extremely helpful to me. Thank you!
Please tell me more about this. May I ask you a question?
Thank you for sharing this article with me. It helped me a lot and I love it.
The firm is based in the Usa and offers third-party
examined products, making certain their purity and effectiveness.
When it comes to buying SARMs, quality is a critical issue to contemplate.
High-quality SARMs can provide efficient and protected outcomes,
while low-quality merchandise might result in reduced effectiveness or unwanted unwanted effects.
As a end result, it is essential to choose reliable
and reputable suppliers when shopping for SARMs.
Since SARMs usually are not obtainable at GNC or comparable complement retailers, interested clients should look for other sources
to purchase these products. It is crucial to guarantee that
the source is respected and offers third-party testing to guarantee the standard and purity of their products.
Unfortunately, whereas mass gainers and protein shakes have their place in your
general journey to building mass they do not
exactly offer the identical advantages as steroids.
Sometimes, real pharma-grade HGH kits can price anywhere from
$600 to $800, generally as a lot as $1000 or extra. The
expense of producing HGH leads the labs to take shortcuts to make sure
their income. Though this cheaper HGH is very tempting when you’re on a price range, most
users will find it far more worthwhile to save money and wait till they will afford real pharmaceutical-grade HGH.
Carpal tunnel syndrome is principally thought of a short-term
facet impact, however in uncommon circumstances,
it could result in nerve injury, resulting in everlasting lack of sensation within the hand space.
There are loads of legal steroid options that may help provide you with a
aggressive edge. There is one major reason why individuals select legal
steroid alternate options quite than the actual factor, and that is as a end result of
they are safer to use with less risk of encountering any unwanted effects.
Properly, there what Are steroids some dietary
supplements available on the market that can actually help to “mimic” the effects of steroids, with
out truly being one. These authorized steroids are NOT offered in GNC, Walmart, or Vitamin Shoppe, but you CAN find them for sale
on-line. Sure, all of the merchandise manufactured by Loopy Bulk, Brutal Drive or
otherwise are authorized steroids or alternatives to steroids that don’t require
a prescription. We have ensured all of the options we have offered are authorized and protected for use.
We evaluated the status of every complement’s manufacturer
to make sure they have a history of producing high-quality supplements.
Word-of-mouth marketing has led to C9-T11 rivaling creatine and pre-workout nitric oxide (NO2) dietary supplements as the
preferred pure performance-enhancers in amateur athletic locker rooms.
One specific alternative to consider is RAD140, also
called Testolone. It has gained a status for its potent muscle-building properties and favorable security profile.
While RAD140 just isn’t available at GNC, it could be found through reputable on-line distributors.
CBD merchandise have also turn into increasingly well-liked because the demand
for pure remedies for pain, anxiety, and different illnesses rises.
This can be a dosage-dependent side effect that you can keep away from by utilizing HGH sensibly.
Since we virtually at all times use HGH for efficiency purposes alongside
suppressive compounds like AAS, you’ll almost inevitably have to plan a
PCT cycle anyway – it simply won’t have anything to do
together with your use of HGH. Clomid, Nolvadex, or Enclomiphene taken for 4-6 weeks is often adequate.
By incorporating these supplements into your health routine
you will see optimistic outcomes such as improved muscle mass, elevated stamina,
and quicker recovery occasions. HGH is no doubt a strong
and efficient hormone to include in a steroid cycle.
With its advantages past muscle constructing or fats loss, all males
and females can benefit from HGH. Its effects on therapeutic and recovery are often the only cause people need to use HGH.
While you cannot buy SARMs at GNC, they do supply
a wide selection of legal steroid options and dietary supplements that may help
enhance athletic efficiency and muscle-building capacity.
These products could not have the same potency as SARMs,
but they’re considered safer and are approved for human consumption.
We seemed for dietary supplements that disclose the components and dosages on the label or website.
We thoroughly reviewed published research, clinical trials, and scientific literature to determine the effectiveness of every ingredient in authorized
steroids. We solely suggest dietary supplements with strong scientific proof supporting their effectiveness.
TestoPrime is made with natural non-GMO ingredients,
and it is free from soy, dairy, grain, gluten, fillers, components, and dyes.
It increases the degrees of anabolic hormones like testosterone
and IGF-1, which are important for muscle development and energy.
Many nations especially the Usa of America,
Canada, United Kingdom have stopped the manufacturing of
real anabolic supplements. Because the legal steroids are being misused by the customers and generally they met with fatal.
So, fitness freaks search their anabolic steroids from underground labs, black
market. International Locations like India, China,
Indonesia, sell anabolic steroids legally. Some of the bodybuilders weren’t glad by
the native made they usually flip to authorized alternate options.
When you buy authorized options from GNC, there isn’t any fear about violation of
the law.
At the end of the day, these supplements (and even steroids) are merely aids to your actual training in the gym – nothing can complement the
hard work you put in day in and day out.
Winsols major ingredient is Acetyl L-Carnitine – which is clinically
confirmed to help assist in lipolysis (fat oxidation).
This means your body will develop a larger ability to make the most of fat as
gasoline during your workout – perfect for long, exhaustive cardio periods or short bursts of high-intensity.
быстро деньги на карту без отказа быстро деньги на карту без отказа .